dESPair
PATHy 1.0 - Tutorial


    Using VOR and NDB

    Using VOR and NDB navaids as leg start or endpoints is not different from using airports as leg points. Only the way how you enter the identifying code is different.

    Because VOR and NDB identifiers are not unique, you need to tell PATHy more about the navaid. That’s why the From and To lines have two fields each.


INDEX

Back To HabakukSoft

1)
What is PATHy
2.)
Requirements
3.)
Registration
4.) Tutorial
-
Installation
-
Navigation / Controls
-
Exploring the windows
-
Centering the map
-
Measuring distances
  /headings

-
Planning a flight
-
Using airports
-
Using VORs and NDBs
-
Adding legs
-
Printing the MFD
-
Printing the flight plan
-
Saving the flight plan
-
Working with maps
-
Planning VFR flights
5.)
Download / Updates
6.)
Support


    To point PATHy to the correct navaid, you need to supply the frequency and the identifier code.

    Enter the frequency into the first field,
    the identifier into the second field.


    Step 4 - The second leg - towards a VOR

    So, in our example, we want to proceed from LSPL towards the
    Willisau VOR at the frequency 116.90.

    As you can see from the picture to the right, the last leg end point is already filled in the FROM field, speed and FL are kept until you change them manually.

    The cursor is already in the second TO field, ready for input.

    Enter the VOR name “WIL” (not case sensitive) and tab out -
    now you’re in the first TO field, enter 11690 (116.90 without the
    dot) and hit tab key again.

    Tabbing out of the first FROM or TO field always inits the
    calculation of the leg points, and the display of the leg data.

    Use the mouse to move out of the two “hot” fields, without activating the sometimes lengthy search.

    PC USERS: on the win32 platform, there is one more button, labeled “Check legs”. Tabbing out of the fields has no function on the PC, so, you fill in all required fields and hit check legs. If you are satisfied with the displayed legs, you hit “Add leg” just like the Mac users.


    NDBs are treated like VORs:

    Frequency goes into the FIRST from/to field
    Name goes into the SECOND from/to field

    BUT, you must enter the name (ID) before tabbing out of the first
    (frequency) field - with only the ID or the frequency alone, PATHy can’t find the navaid.

    Step 6 - Towards an NDB
    So, in our third leg, we navigate from WIL 116.90 towards
    Rheinfelden RHI 332.

    WIL 11690 is already filled into the FROM fields and the cursor is
    in the second TO field. Simply enter “RHI”, tab, “332” and tab.


    Our third leg is displayed. If you like it the way it is, hit “Add
    leg” to fix it. Else simply change the FROM and/or TO fields and
    tab out again to draw an other path. Scrolling the map before the leg is fixed, will erase all the lines.


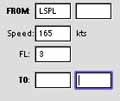
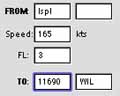
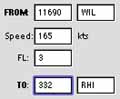
    Step 7 - Arrival airport
    The last leg leads from RHI 332 NDB directly to LSZH, Zürich Kloten. Since LSZH has a VOR placed on the airport, you could choose the VOR as the endpoint. Here, we chose the airport itself.

    RHI 332 is filled into the FROM fields, and the cursor is in the second TO field. Hit “Tab” and enter “LSZH”. Hit Tab again - and fix this last leg.

    Well done. Now you have a detailed plan to fly from LSZB to LSZH using airports and navaids.

    Zoom out to 1.5° view, and your flight plan should look like this:

    You can now print the map by hitting the “Print” button.


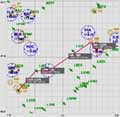
    Adding legs
    As long as a leg’s data is displayed above a dark grey box, the leg is not fixed. This gives you the chance to change your mind on the last leg definition.

    Once you are satisfied with the drawn leg (and it’s detail data), you hit the “Add leg” button below the entry fields. This will add the leg data to the internal leg array, and display the leg data in the flight plan window.