| dESPair PATHy 1.0 - Tutorial
| INDEX Back To HabakukSoft
| |
| Step 3 - The first leg We start from LSZB, Bern-Belp. Enter the departure ICAO four letter ID into the first field of the first row. Hit “Tab” twice (skip the second field in the first row). Enter the leg speed (here 165 kts) + hit tab Enter the flight level (here 3 (3000) feet) + hit tab twice (skipping the second TO field, and landing in the first one, you’ll see later why it works that way...) | ||
| Now that you are in the first field of the TO row, enter our first leg end point - LSPL. Hit “Tab” and your display should now look like the picture to the right: PATHy draws a line between the start and end point of the leg, and displays the departure and arrival ICAO code, the distance, estimated leg time and heading (from leg 1). The leg is not yet fixed. If you scroll or zoom the map, the path will be discarded, and you have to tab through the from and to fields again. | 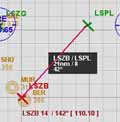 | |
| Fixing/Adding the leg If you are pleased with the path that is drawn in the MFD map, you simply hit the “Add Leg” button. This adds the displayed leg to the flight plan. If you don’t hit this button, the next redraw of the map will erase the displayed path. Once the leg has been added, the data box is drawn in a lighter gray, and the path now is drawn permanently and scrolls along with the map. In the same time, the leg data appears in the “Flight Plan” window. | ||
detail data window for this leg. There you can see the raw values of lat/lon, heading, distance, speed, leg time etc. | 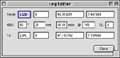 | |
showing the totals of the various values: total trip time, distance and fuel consumption as well as the average speed. So, this is the standard airport-to-airport leg creation. Let’s move on with using a VOR as a leg point. |